Arguably one of the more tedious tasks when building Exchange servers is configuring the disks and volumes. Even in smaller environments, where there may be only two or three databases, the actual number of volumes gets multiplied by the number of copies in the DAG. Consider an Exchange organization that has three databases with three copies of each database. From a configuration perspective that’s nine volumes that need to be configured. Disk Manager does not provide an efficient way to do this. There are multiple tasks and multiple options that need to be selected.
Additionally, Microsoft recommends using the ReFS file system format for the database / log volumes. With this comes the recommendation that the ReFS integrity streams be disabled for the volume. Disk Manager falls short again in that it does not give us the option to set this when configuring a ReFS volume. The good news is that integrity streams are disabled by default unless the volume resides on a mirrored space. For more info see https://docs.microsoft.com/en-us/windows-server/storage/refs/integrity-streams.
Once again, PowerShell comes to the rescue. It allows us to streamline Exchange server builds by providing a method to create the volumes using the recommended settings. I will demonstrate how to set a couple of variables and then create volumes. My example will use mount points instead of drive letters. In fact, you will not need to touch Disk Manager at all if you prefer not to. Specifically, these commands will perform the following:
- Bring the disk online
- Initialize the disk
- Configure it as GPT
- Format the volumes as follows:
- File system type: ReFS with integrity streams disabled
- Allocation unit size: 64K
- Assign a volume label
- Mount the volume as a mount point
This example assumes the disks have already been provisioned to the server – either local storage or through a hypervisor such as VMware or Hyper-V. Either way, these are new disks assigned to the server and are raw.
Step1: Set the variables we use for the configuration
We will set variables that represent the following:
- The Disk number: This is the disk we are going to configure
- Disk label: This is the label that will be assigned to the volume
- Access Path: This is the access path to the mount point. I always have the label and folder name on the access path match
If you do not want the access path and label to match, then change the access path variable to what you desire.
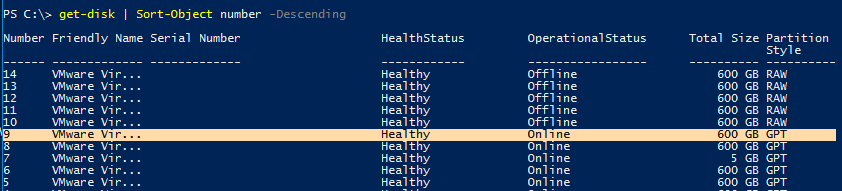
Both Disk Manager and PS can provide the disk number. The screen shots below show a sample disk configuration.
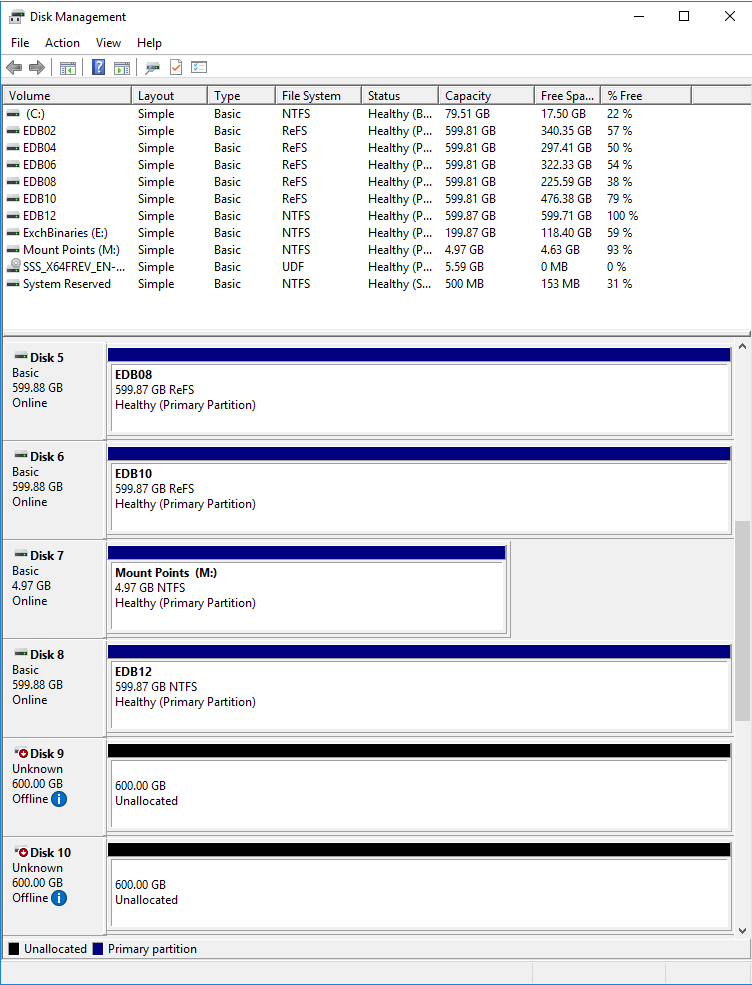
Disks 9 and 10 are the new disks added to the server
Use the following command to get disk information: Get-Disk
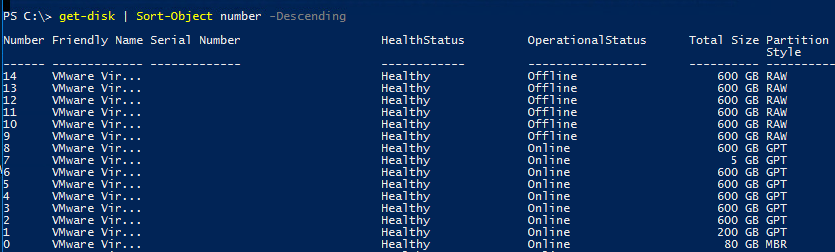
Notice disks 9-14 are offline and raw. These are the new disks that were added.
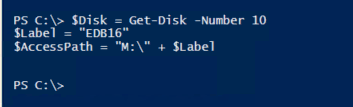
I will use Disk 10 in the example below. Make sure to change this variable to the appropriate disk.
The volume label will be EDB16 and the mount path is M:\EDB16. Again, change these as necessary.
Here are the commands for setting the variables needed to configure the volumes:
$Disk = Get-Disk -Number 10
$Label = "EDB16"
$AccessPath = "M:\" + $Label
The commands for the steps below will leverage these variables.
Step 2: Initialize the disk and configure it as GPT
Set-Disk -InputObject $Disk -IsOffline $false
Initialize-Disk -InputObject $Disk -PartitionStyle GPT

You can verify through PS (Get-Disk) or Disk Manager that these changes were made (Disk 9 in the screen shots below). Disk 9 is now online, but needs to be formatted. PowerShell shows the partition has been set to GPT.

Step 3: Create the volume and partition
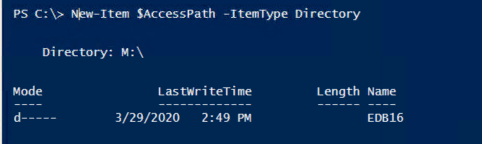
First, create the folder that the new mount point will be mounted to:
New-Item $AccessPath -ItemType Directory
Yes, you can use Windows Explorer – but if I have to demonstrate that, then perhaps you should not be building Exchange servers.
Next, create a new partition and then assign it to a variable
$Disk | New-Partition -UseMaximumSize
$Partition = Get-Partition -DiskNumber $Disk.Number

Notice that the newly created partition number is 2. Partition 1 is reserved for the system files, so partition 2 will be the first usable partition. Exchange volumes should only have a single partition.
Step 4: Format the partition
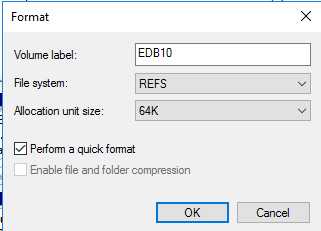
Remember we are formatting this as a ReFS and disabling integrity streams. We are also using a 64K allocation size and assigning a label.


$Partition | Format-Volume -FileSystem ReFS -SetIntegrityStreams $false -AllocationUnitSize 65536 -NewFileSystemLabel $Label -Confirm:$false

If you get an error stating that there is no matching MSFT_Volume, it can be ignored.
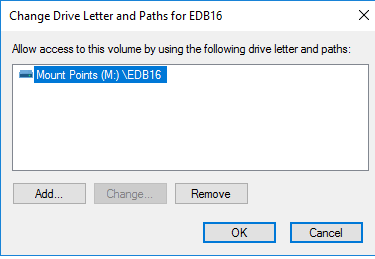
Step 5: Mount the volume to the folder created earlier
In the example we are mounting this to M:\DB16
$Partition | Add-PartitionAccessPath -AccessPath $AccessPath

Sometimes I have received an error saying the access path is not valid. Disk Manager shows that this has been set as expected.
Optionally: Check your work
Let’s confirm things are setup as desired.
$Partition | fl
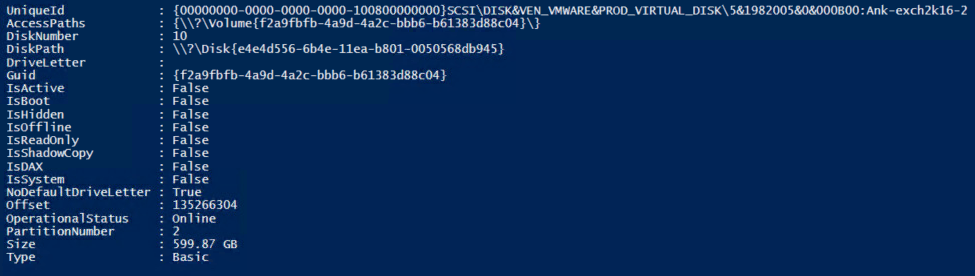
This command will show both partitions: Partition 1, which can be ignored.
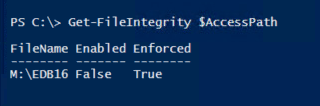
Get-FileIntegrity $AccessPath
Integrity streams is off when the Enabled column shows a value of false.
I typically copy these commands into ISE (make sure to run it under administrator). Then I simply update the variables for each volume I need to configure. With this method I can configure 10 volumes in a few minutes. Now isn’t that much easier and faster than using Disk Administrator?
Here are the commands strung together:
#Set Variables
$Disk = Get-Disk -Number <Disk number> # Disk number to operate on
$Label = "Label" # Volume Label
$AccessPath = "M:\" + $Label # Access path on the mount point. If the label and path don't match then add the path here
#Initialize Disk
Set-Disk -InputObject $Disk -IsOffline $false
Initialize-Disk -InputObject $Disk -PartitionStyle GPT
#Create the volume and partition
New-Item $AccessPath -ItemType Directory # Create the target folder on the mount point drive
$Disk | New-Partition -UseMaximumSize # Create a partition using all drive space
$Partition = Get-Partition -DiskNumber $Disk.Number # Get the partition number of the new partition.
Ignore the no matching MSFT_Volume error
#Format the partition
$Partition | Format-Volume -FileSystem ReFS -SetIntegrityStreams $false -AllocationUnitSize 65536 -NewFileSystemLabel $Label -Confirm:$false
#Mount the volume to the folder created earlier.
$Partition | Add-PartitionAccessPath -AccessPath $AccessPath
#Check your work
$Partition | fl #Verify the volume
Get-FileIntegrity $AccessPath #Confirm data integrity streams are off
Reference:
Exchange storage configuration options
ReFS integrity streams