Background
If your organization has deployed a Microsoft Certificate Authority (CA) for its PKI solution, your users probably started inquiring recently what the yellow triangle in the address bar of Google Chrome is all about (if they haven’t, either you are ahead of the curve or your users are… Well, I won’t go down that slippery slope).

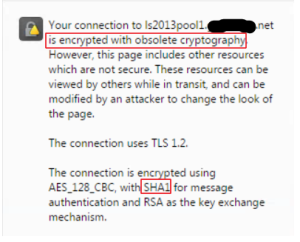
When clicking on the padlock, additional information shows that the website is encrypted with obsolete cryptography. Additionally, there is a reference that SHA1 is used for message authentication.
So, what is this all about, and why do Internet Explorer and Firefox not show a warning?
The basis for this message lies with the SHA1 hashing algorithm for x.509 certificates used for SSL encrypted web traffic. The SHA1 cryptographic hash algorithm was introduced in 1995 and is now considered to be too weak to properly secure public web sites. As such, it is being deprecated.
Microsoft, Google, and Mozilla have posted differing strategies for deprecating SHA1. You can find these strategies at:
Rather than rehash the articles, I will provide the highlights. (I recommend reviewing these in part because Microsoft has made course adjustments, so things may change, and my summary is very high-level.) These companies provide a staged approach to moving away from SHA1. Here are the important points:
- The general date for SHA1 deprecation for SSL signing is January 1, 2017. As such, SSL signed certs that expire after this date should be replaced.
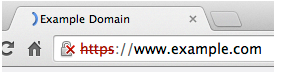
- Google started sunsetting SHA1 in September, 2014 with the release of Chrome version 39. This is when the padlock with the yellow triangle was introduced that points out a SHA1 protected web site.
- Beginning with Chrome 41, SHA1 certificates that expire on January 1, 2017 or later will be treated as “affirmatively insecure.” This means the visual indicator will display the more common padlock with a red X and a red strike through the https.
- Subsequent versions of Chrome will turn up the heat on SHA1 use.
- Windows will stop accepting SHA1 end-entity certificates by January 1, 2017.
- Windows CAs should stop issuing new SHA1 SSL end-entity certificates by January 1, 2016. The reason being that certificates are valid for a minimum of 1 year. Since the generally accepted date for deprecation is Jan 1, 2017, SHA1 certs should not be created after Jan 1, 2016, because the expiration date of the certificate would be past the deprecation date.
- See the Microsoft KB article for specifics on code signing certificates.
- Microsoft is going to reevaluate their policy in July, 2015
- Mozilla has stated that they are in agreement with Microsoft and Google and that SHA1 certificates should not be issued after Jan 1, 2016 or trusted after Jan 1, 2017. They will phase in varying degrees of messages moving forward. After Jan 1, 2017 Firefox will show SHA1 protected sites as untrusted.
It is important to recognize that as of the time this article was written, SHA1 has not been compromised.
Ok, so now you know the story about SHA1 being deprecated. The next question, of course, is how do you upgrade the CA to support SHA256 (which is sometimes referred to as SHA2)? Before going down that path, however, it is important to take stock of what’s running in your infrastructure. You will need to confirm that the applications, devices, and operating systems support SHA2. From a Microsoft perspective, all currently supported Operating Systems and applications support SHA2 certificates. Windows XP requires SP3 and Windows 2003 needs a hotfix to support SHA2, and obviously the clock is ticking to get it. (See https://support.microsoft.com/en-us/kb/968730/en-us.)
If, after doing your research, you find that SHA1 is still needed because you have something in your environment that won't work with SHA2, you can stand up additional PKIs so that both types can be run simultaneously in your environment. I’d also place an unpleasant call to the vendor to ask them what their plan is to get with the program!
Since you are still reading, you have presumably decided to push ahead with rolling out SHA2. Great, so what needs to be done?
First off, you need to determine the cryptographic provider that the CA has been configured to use. There are two types:
If your CA is running as a CSP, then it must be upgraded to KSP before the hash algorithm can be upgraded to SHA2. When Microsoft released Certificate Services with Windows Server 2003, the cryptographic provider was a CSP. Starting with Windows Server 2008, Microsoft changed the provider to KSP. However, even if the CA was upgraded from Windows 2003 to either Windows 2008 or 2012, chances are the provider was not upgraded. During a typical upgrade you often maintained the existing private key (even if you did create a new pair, you may not have increased the hash algorithm). As such, the new CA continued to use the legacy provider since that is what the private key for the CA was using.
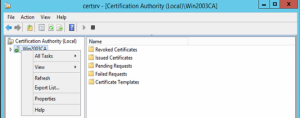
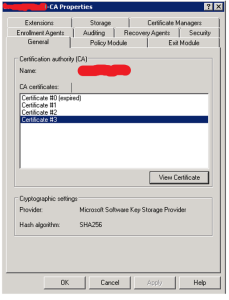
The easiest way to determine the provider is to open the Certification Authority Management console, right-click on the CA name and select properties.
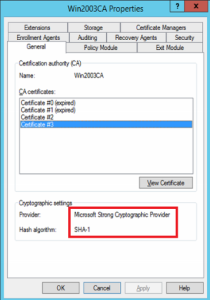
Click the General tab if need be. Take note of the Cryptographic settings (shown below highlighted in red).
You can also get this information by entering the following command from a command prompt:
- CertUtil –store my <Name of your CA>
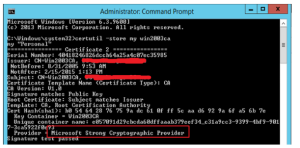
From the example above, you will observe that the Provider is Microsoft Strong Cryptographic Provider, which is a CSP - meaning an upgrade is necessary. Also notice that the hash algorithm is SHA1 (shown in Win2003CA Properties Screen above).
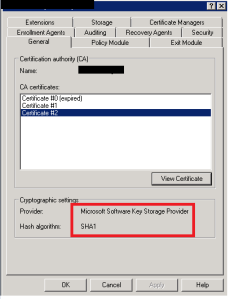
If Certificate Services was installed for the first time on Windows 2008 or 2012 Server, it is likely that the provider is a KSP. See the graphic below.
The potential bad news, though, is that the Hash Algorithm may still be SHA1 because of how prevalent SHA1 is, in which case, the hash algorithm needs to be upgraded. The good news is that upgrading the hash is a very simple process. The steps are provided in the Change the CA Hash Algorithm to SHA2 section below.
Migrating from a CSP to a KSP
Here is a Microsoft KB article for migrating a CSP to a KSP: https://technet.microsoft.com/en-us/library/dn771627.aspx.
Note: Microsoft’s recommendation is that the CA be running on Windows Server 2012 or 2012 R2 before migrating to a KSP. As such, if your CA is currently installed on Windows Server 2003 or 2008, it must be upgraded first to a newer OS first. If you need to upgrade this is a good Microsoft KB to guide you through the process: https://technet.microsoft.com/en-us/library/ee126140(v=ws.10).aspx
In my example, I will upgrade the CA running on a Windows 2012 R2 Server to a KSP (Microsoft Software Key Storage Provider) from a CSP (Microsoft Strong Cryptographic Provider). Then I will upgrade the hash Algorithm from SHA1 to SHA2. This CA was originally running on a Windows 2003 Server, which I migrated to Windows 2012 R2 on a different rainy Sunday. (Sorry, I did not write a blog for that.)
One last note: these instructions are specifically for Windows Server 2012 R2. If your CA is on Windows 2012, review the KB article above, as there are some slight differences.
Make sure to run PowerShell as an administrator to perform these procedures. Also, create a working folder – I like to call it C:\CABackup
Step 1: Back up the Certificate Authority
- Backup-CARoleService –path <Your Backup Directory>
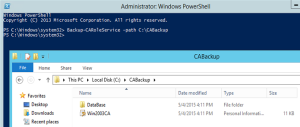
Notice the backup of the root certificate and the Database folder that gets created as part of the backup.
Step 2: Back up the CA’s registry settings
- reg export HKLM\SYSTEM\CurrentControlSet\services\CertSvc c:\<Your Backup Directory>\CAregistry.reg
Step 3: Stop the CA Service (Active Directory Certificate Services)
Step 4: Record the details of the CA – specifically the values of the certificate hash and key container as you will need this information later
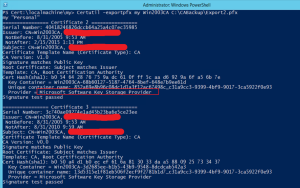
- Certutil –store my <Your CA common name>
- I like to pipe this to a file so you can reference this data later if need be: Certutil –store my win2003ca > CADetails.txt
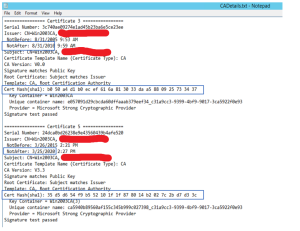
Notice the highlighted entries above showing that the two certificates in this example are SHA1. You will need the Cert Hash value in the next step.
I also highlighted the expiration dates of the two certs (I have four certificates in my CA). As you can see, the first one has expired. I show this because in the next step you will delete the certificate keys. It is important that you run the command in step 5 against all certificates that are listed – even if they are expired. Do not assume that because the certificates are expired you can ignore them. (I did, and got into trouble.) If you fail to do this, the CA service will not restart.
Step 5: Delete the existing certificates and private keys that were identified in the step above:
- CD cert:\localmachine\my
- Del –DeleteKey <Cert Hash for each cert identified above>

- Repeat for all certificates
Step 6: Migrate the certificate and private key to a KSP – this operation is performed on the certificate file that was generated from the backup in step 1.
This step will prompt for the password of the backup certificate that was created in step 1. Since the command to back up the certificate did not ask to create a password, the password is blank.
- Certutil –csp <KSP name> -importpfx <Your CA cert>
- In my example: CertUtil –CSP “Microsoft Software Key Storage Provider” –ImportPFX C:\CABackup\win2003ca.p12”
- Notice the four certificates that were identified in step 4 above have been updated (Added to store)

Step 7: Export the updated CA to a PFX file. This step will create a new certificate file that will be re-imported into the CA.
- Certutil –ExportPfx my <CA Common Name> <PFX file path for export>
- In my example: Certutil –ExportPfx my Win2003CA C:\CABackup\Export.pfx
Notice that the provider for the certificates have been upgraded to a KSP.
Step 8: Restore the updated certificate created above to the Certificate Authority
- Certutil –RestoreKey <PFX file path>
In my example: Certutil –RestoreKey C:\CABackup\Export.pfx.

Step 9: Import the registry settings for the CSP
- Run this command to determine the hash algorithm the certificate is using: Certutil –v –getreg ca\csp\HashAlgorithm
Notice the hash algorithm is SHA1. If it is something else, make sure to add that value to registry entry file created below.

- Create a registry file named csp.reg, which will be imported into the registry. Create it as I have below making sure to include the header with a carriage return. Also, make sure to change the hash algorithm to the correct one if it is not shown as a SHA1 as in my example.
| Windows Registry Editor Version 5.00
[HKEY_LOCAL_MACHINE\SYSTEM\CurrentControlSet\services\CertSvc\ConfigurationWin2003CA\CSP]
"ProviderType"=dword:00000000
"Provider"="Microsoft Software Key Storage Provider"
"CNGPublicKeyAlgorithm"="RSA"
"CNGHashAlgorithm"="SHA1" |
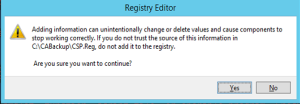
- Import the file by typing: .\Reg.csp
- Answer yes to confirm the import
Step 10: Import registry settings for the CSP Encryption
- Run this command to validate the value of the Encryption Algorithm, which should be 3DES. If it is not, make sure to enter the correct value into the registry file: certutil -v -getreg ca\encryptioncsp\EncryptionAlgorithm

- Create a registry file named EncryptionCSP.reg, which will be imported into the registry
| Windows Registry Editor Version 5.00
[HKEY_LOCAL_MACHINE\SYSTEM\CurrentControlSet\services\CertSvc\Configuration\Win2003CA\EncryptionCSP]
"ProviderType"=dword:00000000
"Provider"="Microsoft Software Key Storage Provider"
"CNGPublicKeyAlgorithm"="RSA"
"CNGEncryptionAlgorithm"="3DES"
"MachineKeyset"=dword:00000001
"SymmetricKeySize"=dword:000000a8 |
- Import the file by typing: .\Reg.csp
- Answer yes to confirm the import
Restart the Certificate Services and confirm that the CA provider is now a KSP. If so, you may move onto the next section to upgrade to SHA2.
Obviously, if you have subordinate CAs, you need to run this process for each one.
Change the CA Hash Algorithm to SHA2
Once the CA has been upgraded to a KSP, the steps to change the hash are as follows:
- Stop Certificate Services: Net Stop certsvc
- To change the Hash Algorithm enter the following command: certutil -setreg ca\csp\CNGHashAlgorithm <Hash Algorithm>
- For example, to change the hash algorithm to SHA2 enter: certutil -setreg ca\csp\CNGHashAlgorithm SHA256
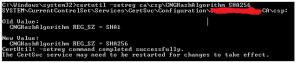
- Restart the CA
- Renew the root certificate for the CA (See below for instructions)
- For root CAs: Renew the certificate for the root CA
- For subordinate CAs: Renew the parent CA first and then renew the certificate for the subordinate CA(s)
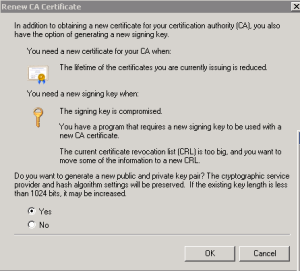
To renew the root certificate for a CA:
- Open the Certification Authority Management console, right click on the CA name and select All Tasks > Renew CA Certificate…
- Select Yes to generate a new public and private key pair
That’s it – you now have a Certificate Authority that can create certificates using SHA2 (aka SHA256) hash algorithm. See the graphic below.
So, get those CAs updated because the clock is ticking.