Splunk allows the transformation of dashboards into forms, which present controls for users to enter search criteria. This allows you to have text boxes, pulldown lists, checkboxes, radio buttons, and other controls at the top of the form. The user’s selections from these input controls are stored in tokens that you can use in your queries or to control various aspects of the form.
You can also add these input controls to specific panels on your form, not just at the top of the page. This makes it clear that the input control is specific to that panel. In this example from the Splunk App for Windows Infrastructure, there are inputs at the top of the form outlined in red and panel-level controls outlined in blue. The left group of controls in blue are specific to the CPU Metrics panel and the right pull-down in blue is specific to the Memory Metrics panel, whereas the controls in red are global to the Performance Monitoring dashboard.
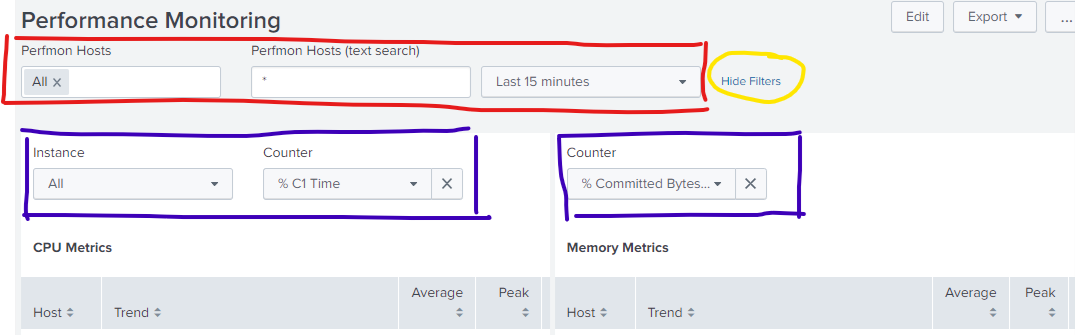
Splunk automatically adds a clickable link to the controls at the top of the form labeled “Hide Filters” (circled in yellow). When you click this link, the controls outlined in red will be hidden and the link will become “Show Filters” (below, yellow):
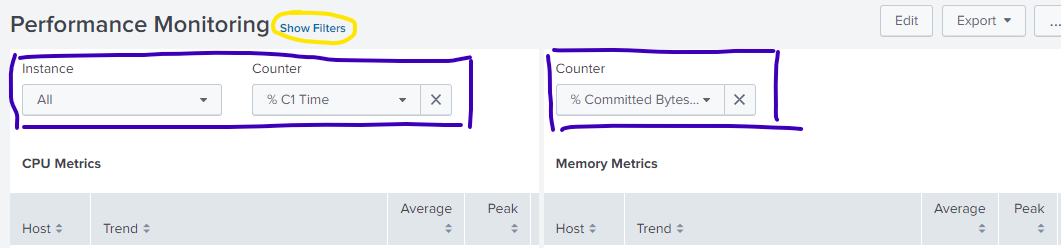
But also notice that the panel-level inputs (blue) did not hide. Unfortunately, Splunk does not give you a way to hide these controls when “Hide Filters” is clicked.
One workaround is to add your own checkbox somewhere on the form that says “Hide all filters” and sets/unsets a token that you can use in a “depends=”$token$”” parameter with each <input> stanza. That will work, but it’s not as nice as hiding everything with a single click of the default “Hide Filters” link.
Fortunately, there is a way to do this with a little JavaScript. We will use the same token technique to hide the panel-level inputs, but instead of adding a checkbox to the form to control the token, we will set and unset the token when “Hide Filters” and “Show Filters” are clicked. This can be done by adding on.click handlers to the “Hide Filters” and “Show Filters” links that will set and unset the token. This function looks like:
$(“<HTML_element_class_name>”).on(“click”, function(){ <code_to_run> })
First, let’s write the JavaScript code we need. We begin with the Splunk SDK include statements:
|
require([
"splunkjs/mvc",
"splunkjs/mvc/simplexml/ready!"
], function(mvc) {
|
Include the usual headers to import the Splunk MVC classes.
|
We need access to the token models of the form in order to set and unset tokens. There is the “default” token model, which is affected whenever you change an input, and the “submitted” model, which updates when you click “Submit”. We will want to update our token in both models. Let’s use the token name “$showFilters$”.
|
var tokensDefault = mvc.Components.get("default");
var tokensSubmitted = mvc.Components.get("submitted");
|
Load the two token models into the variables tokensDefault and tokensSubmitted so we can change the tokens later.
|
The “Hide Filters” and “Show Filters” links are members of the HTML classes “.show-global-filters” and “.hide-global-filters”. We need to assign a function to each of these classes that will set and unset $showFilters$ when each link is clicked. The biggest problem is that the “Show Filters” class seems to be deleted each time the form switches to “Hide Filters”. So although you can assign the on.click function to “Hide Filters” at any time, there is no way to assign it to “Show Filters” unless that class is currently visible.
Here’s how you can work around this problem. When the user clicks “Hide Filters” on the form, we are going to unset $showFilters$ in the class’s on.click function. We can add a little more code to that function that waits, say, 100ms while “Hide Filters” is hidden and “Show Filters” is created. Then have the function continue by assigning the function we need to “Show Filters”, now that it exists.
When the dashboard first loads and the javascript runs, the current state of the form is unknown—it may be showing “Hide Filters” or “Show Filters”. If it is showing “Show Filters” (meaning the input controls are currently hidden) we can go ahead and assign the function to the class and unset $showFilters$ in both token models. If “Hide Filters” is showing the first time through, here we will just set $showFilters$ to “true” (it doesn’t actually matter what value we set the token to, as long as it is set).
Be sure to keep straight in your mind which code will execute when the form initially loads (not part of an on.click function) and which code will run when a link is clicked.
|
if (document.querySelector('.show-global-filters') !== null) {
$(".show-global-filters").on("click",function(){
tokensDefault.set("showFilters", "true");
tokensSubmitted.set("showFilters", "true");
});
tokensDefault.unset("showFilters");
tokensSubmitted.unset("showFilters");
} else {
tokensDefault.set("showFilters", "true");
tokensSubmitted.set("showFilters", "true");
}
|
First, let’s check if “Show Filters” is currently showing by testing if the “.show-global-filters” class exists. If it does, go ahead and assign the on.click function to the class (which will set $showFilters$ to true when clicked), but for now unset $showFilters$ since they should not be visible.
Otherwise, “Hide Filters” is visible, so set $showFilters$ to true.
|
Since the “.hide-global-filters” class always seems to exist, we can always assign the on.click function to that class, which we do here:
|
$(".hide-global-filters").on("click",function(){
tokensDefault.unset("showFilters");
tokensSubmitted.unset("showFilters");
setTimeout(function() {
$(".show-global-filters").on("click",function(){
tokensDefault.set("showFilters", "true");
tokensSubmitted.set("showFilters", "true");
});
}, 100);
});
});
|
For the “Hide Filters” action, we need to unsest $showFilters$ so the inputs hide when it’s clicked.
Then the function should wait 100ms and assign the on.click function to “Show Filters”, which should have appeared.
And close everything up.
|
Save this JavaScript in etc/apps/splunk_app_windows_infrastructure/appserver/static/windows_performance.js (you can change the app name to your own application, as long as you still put the script in its “appserver/static” directory). Now you need to get SplunkWeb to recognize that the new file exists. You will need to do this every time you make a change to the code so the cached version of the code is flushed from the browser and the latest version is downloaded. Browse to (assuming you are using https) https://<your_server>:<your_port>/<your_encoding>/_bump (that might look like https://splunksh1.domain.net:8000/en_US/_bump for you). You should see a version number and a button labeled “Bump version” (your version number will probably be different).
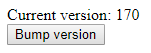
When you click “Bump version”, the version count will increment on the server. Then you need to reload the Splunk form in the browser (browser reload button) so it checks with the server and notices the script version has changed. The browser will then download your new/latest code and use it. Note that, sometimes when you edit the form’s XML in the GUI (Edit button => Source button), the JavaScript may stop running and any CSS you defined may not be applied. Just click Reload in your browser to get everything synced again.
Now you just have to tell the form to use the script and the token. Change the first line of the dashboard Simple XML from:
<form stylesheet="custom.css">
to
<form script="windows_performance.js" stylesheet="custom.css">
Notice that you don’t need a path; whatever you put here is relative to the appserver/static directory. And now, for each panel-level <input> definition, append depends="$showFilters$". For instance,
<input type="dropdown" token="MemoryCounter" searchWhenChanged="true" depends="$showFilters$">
This will cause each panel-level input to hide when the token is unset. You do not need to add the “depends” parameter to the inputs at the top of the form since Splunk takes care of hiding those already. Now, with one click, you can have a clean form appropriate for snapshotting and adding to a report.